Showing posts with label bitter-sweet chocolate. Show all posts

Sunday, May 13, 2012

Understanding Chocolate

I am sure you would all agree that it would be wonderful to be able to sculpt something even close to this sculpture featured below.Unfortunately I'm a chocoholic not a chocolatier and I'm sure this would take many years of training and practice.Whilst I will  probably never produce anything like this I realize that without even the basic knowledge of chocolate I would have even less of a chance.I even thought that some people may even be afraid to work with chocolate so I decided to write a post trying to help people understand a little bit more about chocolate hopefully inspiring people to create some chocolate desserts and cakes and well basically anything with chocolate in it. So whilst  I can only aspire to create something like this sculpture I can carry on making some pretty nice chocolate dishes and I am sure you will be doing the same soon if not already.
Check the size of this sculpture


Monday, April 23, 2012

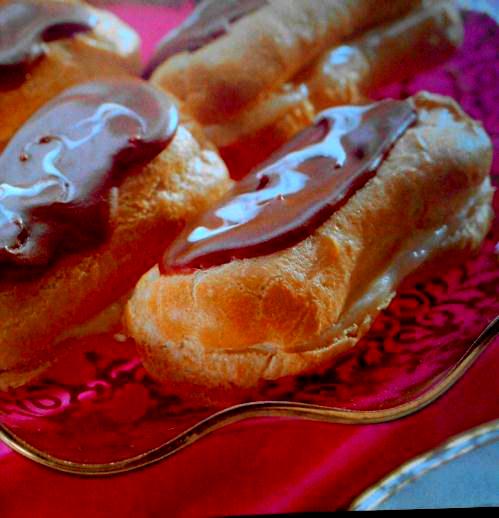
Chocolate Éclairs

Once more into the breach as I continue to share recipes with you to allow you to be able to create a lavish afternoon tea party yes it really is a quest for me because I was quite taken aback when I heard that people were paying upwards of £80 per head to partake in afternoon tea I just can't believe that someone would pay that much for some nice sandwiches some nice cakes and a pot of tea.I understand it's because your'e paying for the experience, The name of the establishment, the background music, the heavily starched table covers and the sound of people opening their wallets and purses and handing over those crisp notes straight from the cash point. just to feel special.after all we are all in together.

With these recipes we can provide our own afternoon tea experience for a fraction of the cost in fact we can probably provide afternoon tea for 20 people for £80 we all have serene background music we can play a nice table cloth we could starch,as for the name of the establishment just call it my Home.As for the sound of people opening their wallets and purses and producing those crisp notes that will surely be replaced  by the sound of people enjoying themselves and laughing at those you pay this money then we can say we are all in it together.
So to our recipe this is slightly more difficult than a most of my recipes but if you follow the steps to the letter it will be worth it and these éclairs will really look spectacular so without any more rabbiting on. The recipe
Chocolate Éclairs

Ingredients

Choux pastry ( Pie dough):

150 ml/ 1/4 Pint/ 2/3 cup water
60 g/ 2oz/ 1/4 cup butter, cut into small pieces
90 g/ 3oz/ 3/4 cup strong plain (all-purpose) flour, sieved (strained)
2 eggs

Patisserie cream:

2 eggs, lightly beaten
50 g/ 1 3/4 oz/ 4tbsp caster (superfine) sugar
2 tbsp cornflour (cornstarch)
300 ml/ 1/2 pint/ 1/4 cups milk
1/4 tsp vanilla flavouring (extract)

Icing:

25 g/ 1 oz/ 2 tbsp butter
1 tbsp milk
1 tbsp cocoa powder
100 g/ 3 1/2 oz/ 1/2 cup icing (confectionares') sugar
a little white chocolate, melted

Instructions

1.Lightly grease a baking tray (cookie sheet). Place the water in a saucepan, add the butter and heat gently until the butter melts. Bring to a rolling boil, then remove the pan from the heat and add the flour in one go, beating well until the mixture leaves the sides of the pan and forms a ball. Leave to cool slightly, then gradually beat in the eggs to form a smooth, glossy mixture. Spoon into a large piping bag fitted with a 1 cm/ 1/2 inch plain nozzle (tip).

2.Sprinkle the tray (sheet) with a little water. Pipe eclairs 7.5 cm/ 3 inches long spaced well apart. Bake in a preheated oven, 200oC/ 400oF/ Gas Mark 6, for 30-35 minutes or until crisp and golden. Make a small slit in each one to let the steam escape; cool on a rack.

3.To make the patisserie cream, whisk the eggs until and sugar until thick and creamy, then fold in the cornflour (cornstarch). Heat the milk until almost boiling and pour on to the eggs, whisking. Transfer to the pan and cook over a low heat, stirring until thick. Remove the pan from the heat and stir in the flavouring (extract). Cover with baking parchment and cool. To make the icing, melt the butter with the milk in a pan, remove from the heat and stir in the cocoa and icing sugar. Split the eclairs lengthways and pipe in the patisserie cream. Spread icing over the top of the eclair. Spoon over the white chocolate, swirl in and leave to set.


Macs tip

To save time instead of Patisserie cream: you could use fresh whipped cream.
A alternative topping can be made by melting 4oz dark chocolate then gradually adding the juice from a tin of peaches till it reaches a coating consistency.

Chocolate facts.

Cocoa and chocolate can increase the level of serotonine in the brain. Serotonine levels are often decreased in people with depression and in those experiencing PMS symptoms

Sunday, April 22, 2012

Chocolate Tea Bread

The Tea ShelvesThe Tea Shelves (Photo credit: 0olong)
What better in the afternoon than to sit down with a cup of tea and a slice of tea bread, And when it's made of chocolate it's even better.There is probably no better way than to continue my quest to give you the recipes to produce your own lavish afternoon tea party than with a chocolate tea bread.

Using chocolate chips,raisins and walnuts have a slice of this  tea bread with your cup of afternoon tea and tea will never taste the same without a slice again.This is a real must for our afternoon tea party and of course for any other time you have a cup of tea these two together really our classic like pork and apple,lamb and mint . tomato and basil anyway lets not ramble on here's the recipe.

Chocolate Tea Bread

Recipe

175g /6 oz softened butter
100g /3 1/2 oz muscovado sugar
225g /8 oz self-raising flour
4 large eggs lightly beaten
50g /1 3/4oz chopped walnuts
225g /8 oz  dark/plain chocolate chips
100g/3 1/2oz raisins
finely grated rind of 1 orange

Instructions

1.Preheat the oven to 170C/325F/Gas Mark 3. Lightly grease a 900g/2lb loaf tin and line base with baking parchment.

2.Put the margarine, sugar,  in a large bowl and,  beat together until light and fluffy.Gradually add the eggs beating well after each addition. and fold in the chocolate chips walnuts,raisins and orange rind.Sieve in the flour and fold in.

3.Spoon the mixture into the prepared loaf tin make a slight dip in the centre of the top with the back of a spoon.And bake in pre heated oven for 1 hour or until a fine skewer inserted in the centre comes out clean.

4.Leave to cool in the pan for 5 mins then carefully turn out on to a wire rack and leave to cool completely.

5.To serve cut into thin slices.


Macs tip

This tea bread can be frozen well wrapped for up to 3 months defrost at room temperature.
White chocolate chips or milk chocolate chips instead of dark chocolate chips can be used or why not try a mixture of all 3.

Chocolate facts


One ounce of baking chocolate or cocoa contains 10% of the daily recommended intake of iron.


Chocolate cupcakes with cream cheese topping

Cupcakes are fun to make.Cupcakes are fun to make. (Photo credit: OrangeCounty_Girl)
Well here we are again continuing to give you even more recipes for you to be able to create your very own lavish afternoon tea. The resurgence in afternoon teas has seemed to also sparked a revival in cupcakes, with bakeries,supermarkets and even cupcake shops springing up all over the place producing all varieties of cup cakes all with there own twist.

The recipe I am going to share with you is no exception this chocolate cupcake is topped with a very nice white chocolate cream cheese topping, and will grace any afternoon tea cake stand and taste even better.

Chocolate cup cakes with white chocolate cream cheese topping


Recipe

85g /3 oz soft tub margarine or softened butter
100g /3 1/2 oz caster sugar
2 large eggs lightly beaten
2 tbsp milk
25g /1 oz cocoa powder
55g/2oz chocolate chips

Filling

150g /5 1/2 oz low fat cream cheese
225g /8oz white chocolate
chocolate curls for decoration

Instructions

1.Preheat the oven to 200c/400F/Gas Mark 6. Put 18 paper baking cases in a 2 bun trays, or put 18 double-layer paper cases on a baking tray.

2.Put the margarine/butter, sugar, flour,  in a large bowl and, using an electric hand whisk, beat together until light and fluffy. gradually add the eggs beating well after each addition.add the milk and fold in the chocolate chips.sift in the flour and cocoa powder together. fold into the mixture Spoon the mixture into the paper cases, and smooth the tops.

3.Bake the cupcakes in the preheated oven for 20 minutes, or until springy to the touch. Transfer to a wire rack and leave to cool.

4.To make the icing break the white chocolate into little chunks into a heat proof bowl and set the bowl over a saucepan of gently simmering water until melted .Leave to cool slightly.Put cream cheese in a bowl and beat till soft.Then beat in the slightly cooled chocolate.

5.Spread a little of the icing on the top of each cupcake and leave to chill in the refrigerator for around 1 hour.
Decorate with chocolate curls and enjoy.

Macs tip

Various garnishes could be used to decorate depending on the occasion.

Chocolate facts

The world’s largest box of chocolates weighed in at 2,002 lbs. It was made in Chicago, USA, and contained Frango mints.


Monday, August 8, 2011

Chocolate Pots Duet

I have decided it's time I eventually got round to posting  a summer recipe, this is a great recipe for the summer and is called chocolate pots duet because they work so well together and work in perfect harmony.I only tried this dish a few weeks ago and I have to admit it was really good it can be accompanied with brownies or cookies or any selection of your favourite fruits for dipping Strawberries, Bananas,Kiwi fruit the list is endless and I'm sure you all have your own preferences so without further ado here is the recipe i hope you all enjoy.

Ideal for this hot summer 

Ingredients


Brownies
140g unsalted butter
200g dark chocolate
200g light muscovado sugar
2 tsp vanilla extract
Pinch of salt
3 eggs
85g plain flour
Chocolate and cream liqueur pot
140g dark chocolate
142ml carton whipping cream
5 tbsp Baileys cream liqueur
250g carton of mascarpone
Chocolate and olive oil mousse
Chocolate And olive oil mousse
200g dark chocolate, melted
115ml olive oil
200ml pouring cream, whipped
To garnish
Handful of chocolate shavings
6 fresh strawberries
Method

Brownies

  1. Preheat the oven to 160C and grease an 18cm cake pan.
  2. Melt the butter and chocolate in a bowl over a bain marie, combine until smooth and set aside to cool slightly.
  3. Beat the sugar, vanilla extract and salt into the chocolate mix.
  4. Add one egg and beat until well combined. Add the second egg and beat again then repeat for the third egg.
  5. Add the flour and beat until smooth.
  6. Pour the mix into the greased cake pan and bake for 40 minutes.
  7. Once cooked, leave to cool. Using a cutter, cut 4 circles to fit into the bottom of the ramekins and slice what’s left into small cubes.

Chocolate and cream liqueur pot


  1. Melt the chocolate over a bain marie and set aside until cooled.
  2. Whisk the cream until it forms soft peaks and fold in the Baileys.
  3. Beat the mascarpone until smooth. Add in the Baileys cream mixture and combine.
  4. Pour the cooled melted chocolate into the cream mix and delicately ripple through (don’t combine completely - it should keep the pattern).
  5. Chill in the fridge for 20 minutes.
  6. Add a small round of brownie mix to two ramekins. Top each with the chocolate cream mix and garnish with a whole strawberry.

Chocolate and olive oil mousse

  1. Melt the chocolate over a bain marie.
  2. Once melted, gradually add the olive oil and cream, whisking continuously until thick and glossy.
  3. Chill in the fridge until set.
  4. Add a small round of brownie mix to two ramekins. Top with the mousse and garnish with chocolate shavings.

To serve
Add one of each pot to the plate. Add some brownie squares at the bottom of the plate and garnish with a strawberry either side of the brownies.

Macs tip
This recipe serves two but you could easy double,treble or quadruple the recipe it will keep in the fridge for around 7 days. Don't forget to date label it

Chocolate facts
The largest chocolate ever made was a chocolate marzipan. It was made in the Netherlands over a 3-day period and weighed 4,078 lbs!


Wednesday, June 8, 2011

Chocolate Feast served with Chocolate ice cream, Boozy fudge sauce and a Chilli caramel latice.

O.K. guys and gals I know I advertise quick and easy recipes but surely as editor,compiler, cook and chief bottle washer I deserve the right to throw in the occasional curved ball or a slightly more complicated dish.Please don't let that put you off there are quite a few elements to this dish but taken step by step it is a averagely easy dish the only downside is the prep time of around 3 hours but I can assure you it will be more than worth it.
This dish is really a huge Chocolate feast whether you like dark,milk or white chocolate it is all here in this dish and the combinations of textures and flavours really do endorse this dish that is fit for any special occasion or just for your own family,s indulgence so please enjoy any comments welcome.


Ingredients


Biscuit base

  • 35g salted butter
  • 100g double chocolate cookies
  • 20g finely chopped roasted hazelnuts
  • 10g soft brown sugar
  • Groundnut oil, for greasing

Ice cream

  • 75g caster sugar
  • 2 large organic egg yolks
  • 125g good quality dark (70%) chocolate, plus 50g grated
  • 250ml double cream
  • 50g unsalted butter

Dark chocolate layer

  • 100g good quality dark (70%) chocolate
  • 100g crème fraîche
  • 100g Greek yoghurt
  • ⅛ tsp fine (ground) sea salt (optional)
Milk chocolate 

  • 130g good quality milk chocolate
  • 120g crème fraîche
  • 80g Greek yoghurt
  • ⅛ tsp espresso powder (optional)

White chocolate layer

Colour of caramel
  • 160g good quality white chocolate
  • 140g crème fraîche
  • 60g Greek yoghurt
  • ½ tsp vanilla bean paste

Chilli caramel lattice and curls

  • 100g unrefined golden caster sugar
  • ⅛ tsp ground cayenne pepper

Boozy chocolate fudge sauce

  • 150g double cream
  • 50g salted  butter
  • 50g vanilla sugar (or caster sugar and ½ tsp vanilla extract)
  • 160g good quality dark (70%) chocolate
  • 30ml Cointreau
Instructions

Biscuit base
  1. Melt the butter in a pan then transfer to a bowl.
  2. Break the cookies into quarters and drop into a food processor. Blitz on a low setting – once started, add the nuts through the feeding tube and then the sugar.
  3. Stop blitzing the biscuits as soon as you can see that there are no large pieces at all and the mixture is like breadcrumbs (approximately 20 seconds). Try not to over-process the biscuits as the texture will be too fine if you do.
  4. Add the crumbs to the bowl of melted butter and stir well to combine.
  5. Line six 6cm ring moulds with foil that folds over the outer edges. Lightly oil the inner surface of the foil with the groundnut oil. Divide the crumb mixture between the moulds and press down firmly with the back of a metal spoon, making sure the edges are really neat and the base is flat.
  6. Place the tray into the fridge to chill and set while you make the chocolate layers to go on top.

Ice cream

  1. Add the sugar and 75ml water to a pan on a medium heat and stir until it dissolves. Then turn the heat up and bring to the boil, boiling rapidly for about 3 minutes (watch it all the time and do not allow the sugar syrup to over-boil and colour – if it does then it may have burnt and you’ll need to start again). Leave to cool for 2 minutes.
  2. Whilst the syrup is cooling, add the egg yolks to a high-sided bowl/jug and whisk with an electric hand-held whisk.
  3. When it’s cool, very slowly and gradually pour the sugar syrup into the egg yolks while continuing to whisk. Keep going until the mixture thickens and becomes pale and the beater leaves a ‘trail’.
  4. Leave the mixture to one side for a moment and start melting the chocolate. Break it into small squares and place it in a glass bowl that will fit into the top of a pan in which you have an inch of barely simmering water (heat it on the lowest setting).
  5. Add the double cream to the egg mix and whisk again until completely combined and slightly fluffy.
  6. Return to the melting chocolate and add the butter to it. Stir continuously to mix it in and ensure that the chocolate is melted fully.
  7. Fold the melted chocolate and butter into the cream/egg/syrup mix until thoroughly combined then pour it into an ice cream machine and churn for 20 minutes (or as per your machine’s instructions).
  8. Meanwhile, roughly grate the extra chocolate and add just two minutes before the ice cream is due to come out of the machine.
  9. Scoop the ice cream into a 900ml airtight plastic box and place in the fast freeze section of your freezer.
  10. The ice cream needs to be left at room temperature for approximately 25-30 minutes prior to serving.

Chocolate layers

NB Make one layer at a time and chill in the fridge whilst preparing the next one
  1. Melt the chocolate by breaking it into squares and placing in a glass bowl sitting on a pan of barely simmering water.
  2. Meanwhile, weigh out the crème fraîche (adding the vanilla bean paste for the white chocolate layer) and yoghurt into a high sided bowl and whisk for 30 seconds with an electric hand whisk.
  3. Once the chocolate has melted add the salt and stir in well, making sure no crystals remain.
  4. Pour the melted chocolate into the yoghurt mix and whisk for 1 minute until it starts to thicken and is thoroughly blended in.
  5. Divide the mixture equally over the biscuit bases and smooth with the back of a metal spoon. Return the moulds to the fridge to chill while you prepare the next layer.
  6. Repeat the method as for the first layer for the milk and white chocolate layers, but adding the espresso powder instead of the salt for the milk chocolate layer.
  7. Chill the dessert in a very cold fridge for as long as possible, but preferably at least 4 hours.

Chilli caramel lattice and curls

  1. Very lightly grease suitable curved metal / glass items (e.g. an individual baking ring, the bottom of a small pudding mould, the back of an ice cream scoop) and place them on a large non-stick baking tray. Also have another baking tray, egg cooking ring, a pair of tongs and a long handled latte/sundae spoon to hand.
  2. Weigh the sugar into a small heavy-bottomed non-stick pan and put on a low-medium heat, stirring occasionally with a silicone spatula. Keep a close eye on it the whole time so that it doesn’t catch and burn.
  3. As soon as the sugar has completely melted and is liquid, take it off the heat and stir in the cayenne pepper thoroughly.
  4. If you’re using curved baking rings, hold them with the tongs. Take a spoonful of the liquid caramel and drizzle it backwards and forwards over half of the ring. Repeat with all of the rings or moulds.
  5. Using the remaining caramel, drizzle spoonfuls from a height of about 20cm over the other baking tray with an egg cooking ring on top as template, flicking the spoon back and forth as quickly as you can.
  6. Once the caramel has cooled and hardened, remove the curls/baskets from the rings/moulds and very gently trim the shapes that you have made on the baking sheet.
  7. Add them to the dessert just before you serve it.

Boozy chocolate fudge sauce

  1. Mix the cream, butter and sugar in a glass bowl over a pan of barely simmering water on the lowest heat (without the bottom of the bowl touching the water) and stir until blended and dissolved. Turn off the heat.  
  2. Break or chop the chocolate into small pieces and add to the cream mixture. Stir until fully combined.
  3. Whisk the mixture lightly with a mini hand whisk while adding the Cointreau, 1 teaspoon at a time, mixing each one in thoroughly before adding the next.
  4. If the sauce is still slightly too thick to be a good pouring consistency, add a little tepid water and mix in thoroughly.
  5. Pour into small sauce pots and serve to the side of the dessert. Some may be used to decorate the plate and a small drop is helpful to stick down the chilli caramel basket/curl to stop it sliding on the plate.

To serve

After removing the desserts from the fridge, leave them to stand at room temperature then top with a chilli caramel lattice just before serving. Serve with a scoop of ice cream resting in a chilli caramel curl/basket and with the warm chocolate fudge sauce in a small pot on the side. If you prefer, top the ice cream with grated chocolate, some of the toasted hazelnuts or spare shards of the caramel.
Macs Tip
To speed things up you can always buy a good quality Ice cream I'm sure no one will know as long as they don't catch you putting it out or leave the tub hanging around
Chocolate facts

Marie Antoinette, was the first Queen to bestow the title, ‘by appointment to the Queen’ on her personal chocolate maker in 1770.

Wednesday, May 25, 2011

Whisky chocolate mousse in marbled chocolate bowls.

Today  I have decided to do something a bit different, I am going to combine a dish which is really nice and strictly for adults. With a technique that I usually use for kids parties so just to clarify the dish is a Whisky Chocolate Mousse served in marbled chocolate bowls this is a very different way of serving a dessert and a bit of a novelty and a good talking point at a boring dinner party, not that I can imagine any of you ever have boring dinner party guests.These bowls are easily made and you can improvise and use whatever designs or chocolate you want to create the effect you want I.E. dark chocolate and milk chocolate or white chocolate or even pipe names or slogans on the bowls or if your guests are that boring even insults the perfect way to end a dinner party maybe just write good night. I have used different images to try and give you some ideas and to show the possibilities are endless.
heavily marbled  chocolate bowl
A light marbled effect
Ingredients
Chocolate cups
300g good quality white chocolate
60g good quality gluten free milk chocolate

Shortbread base
175g butter, softened
85g golden caster sugar
180g gluten free plain flour
50g cornflour (gluten free, check packaging)

Chocolate mousse
160g 70% cocoa dark chocolate
40g gluten free milk chocolate
3 large free range eggs (at room temperature)
Approx 1 tbsp whisky, according to taste
40g caster sugar

Decoration
100g caster sugar, plus extra for coating
6 fresh strawberries
A little strawberry jam, warmed

Heavily marbled effect.


Instructions
Chocolate cups
1.Blow up six balloons (use water balloons as they are small).
2.Break the white chocolate into a small deep bowl. Melt in the microwave on the 500w setting (keep checking the chocolate and give it a good stir every so often).
3.Repeat with the milk chocolate.
With a teaspoon, drizzle the milk chocolate into the white chocolate (criss-crosses are nice).
4.Dip the balloons into the chocolate so that it comes half way up the sides then sit the balloons, chocolate-side down, on a tray lined with baking paper. Place them in the fridge to harden.
5.Once the chocolate has hardened, pop the balloons.
Shortbread base
1.Preheat the oven to 150C.
2.Beat the butter and sugar together in a food processor.
3.Sift together the flour and cornflour.
4.Whilst the food processor is still running, add a spoonful of the flour mixture at a time until all flour is fully incorporated. Beat well for another minute.
5.Use a spatula to scoop the mixture onto a sheet of cling film. Wrap into a ball and refrigerate for approximately 25 minutes, or until firm.
6.Once firm, roll out the dough between two sheets of cling film. Lift the top layer of cling up and dot some jam around the dough. Fold over and repeat until the dough is full of little dots of jam (do not mix together or the dough will turn pink!).
Roll the dough out to a thickness of around 0.75cm.
7.Cut out six circles of dough and place onto a lined baking sheet. Prick with tops with a fork.
8.Cook in the centre of the oven for 20-25 minutes, until just starting to brown.
9.Place the shortbreads on a cooling rack and allow them to cool completely.

Chocolate mousse
1.Place the chocolate and 50ml warm water in a bowl over a pan of barely simmering water and heat gently until melted. Leave to cool for a couple of minutes.
2.Separate the eggs and mix the egg yolks with the chocolate mixture until smooth.
3.Add the whisky (to taste) and mix to incorporate.
Whisk the egg whites until soft peaks appear.
4.Add the sugar a bit at a time, whisking after each addition until the mixture is smooth and glossy.
5.Using a metal spoon, mix a spoonful of the egg whites into the chocolate mixture to loosen it, then very gently fold the remaining egg whites a bit at a time into the chocolate. Make sure all the whites are properly incorporated.
6.Fill the chocolate cups with the mousse mixture then refrigerate for 90 minutes.

Decoration
Add the sugar and 50ml water to a small pan and simmer to dissolve the sugar.
Leaving the leaves on the strawberries, slice them into little fans.
Place the strawberries in the pan and simmer for two minutes then leave in the pan, off the heat for a further two minutes.
With a slotted spoon, remove the strawberries from the pan and coat in a little extra sugar.
Warm a little jam and place in a squeezy bottle.

To serve
Make zigzags of jam across each plate. Place a chocolate cup filled with chocolate mousse in the centre of the plate and serve with the shortbreads. Place a sugared strawberry on top of the shortbread and serve.


Chocolate facts

The best way to store chocolate is by wrapping it in foil and then placing it in plastic. Keep it at a constant temperature of 65 degrees F and 50% humidity.
Dark chocolate stored under perfect conditions will last for 10 years.

Saturday, April 30, 2011

Royals choose chocolate wedding cake.

The British royal family on Buckingham Palace ...The British royal family on Buckingham Palace balcony after Prince William and Kate Middleton were married. Kate wears a wedding gown by Sarah Burton. (Photo credit: Wikipedia)
Hi sorry I haven't posted for awhile but I could not resist this story not a recipe I'm afraid but still a interesting story for those foodies that do not all ready know.
Well as you all know Prince William married Kate yesterday and became the Duke and Duchess of Cambridgeshire. but did you know that because of Prince Williams affection for rich tea biscuits,Mcvities were asked to produce an alternative wedding cake to the original cake and they did and here it is.

Photos courtesy : The British Monarchy


    About the cake: 
McVities crafted the cake at one of its UK plants from a recipe received from Buckingham Palace kitchen chefs.The flawless, square cake rose up three tiers above its golden stand at the afternoon reception.
Detailed with white chocolate water lilies, milk chocolate leaves and a mixture of white and milk chocolate feathers, the cake looked fit for the grand occasion.
The flowers, which had white Malteser-shaped centres, were placed at the corner of each square and several were arranged aesthetically on top.
A smooth, crisp chocolate exterior encased the unbaked delight which was made from dark chocolate for added flavour, crushed rich tea biscuits and some undisclosed secret ingredients.
The company, now part of the United Biscuits Group, has made many of the wedding and christening cakes for members of the Royal Family since the marriage of George V to Queen Mary in 1893.
The cake required zero minutes in the oven as it is a no-bake cake.
There were 12 white chocolate lotus flowers, or water lilies, to symbolize purity, beauty and spiritual perfection. The lotus is also an ancient symbol of light.
The recipe included 1,700 McVities Rich Tea biscuits, and 40 pounds of chocolate.
There was also a selection of 10,000 canapés, both savory and sweet, prepared by 21 chefs who were led by Royal Chef Mark Flanagan. The canapés included assortments of Palmiers and Cheese Straws, White Chocolate Ganache Truffle, and Milk Chocolate Praline with Nuts to serve 650 guests at the reception.
I am sure you will all agree this is some alternative fit for a King And Queen and from things I have read and that have been reported in the news the cake was more popular with the guests than the official cake.
I cannot  complete this post by just showing you the chocolate wedding cake. I feel I have to give you the chance to compare the cakes and see which cake you would prefer so here we go.
The official wedding cake was made by Fiona Cairns and her team and here it is truly a wonderful work of art and I am sure just as tasty as it looks.
Photos courtesy of The British Monarchy


About the cake:
  • There were 17 types of handmade flowers decorating the Fiona Cairns cake.
  • There were 900 individually iced flowers.
  • It was made up of 17 fruit cakes.
  • There were 8 tiers.
    The Royal Wedding Cake
    The British Monarchy
  • The language of flowers spoke with these 17 flowers:
  1. White Rose - National symbol of England
  2. Daffodil – National symbol of Wales, new beginnings
  3. Shamrock – National symbol of Ireland
  4. Thistle – National symbol of Scotland
  5. Acorns, Oak Leaf – Strength, endurance
  6. Myrtle – Love
  7. Ivy – Wedded Love, Marriage
  8. Lily-of-the-Valley – Sweetness, Humility
  9. Rose (Bridal) – Happiness, Love.
  10. Sweet William – Grant me one smile
  11. Honeysuckle – The Bond of Love
  12. Apple Blossom – Preference, Good Fortune
  13. White Heather – Protection, Wishes will come true
  14. Jasmine (White) – Amiability
  15. Daisy – Innocence, Beauty, Simplicity
  16. Orange Blossom – Marriage, Eternal Love, Fruitfulness
  17. Lavender – ardent attachment, devotion, success, and luck
This is a real work of art and I wish I could craft such a cake but I really don't have those skills.
So as you know this blog is mainly a chocolate recipe blog but i really felt I had to pass this info on and i hope you agree it was worth it but what I would like to know is what cake would you choose to have if you could for your wedding  or if you had the choice and could only have  one piece of cake to eat which one, I already know my choice Chocolate every time.


Related Posts Plugin for WordPress, Blogger...